What Does OEM Quality Mean?

If you've ever replaced a part on an appliance, vehicle, or machinery, you might've encountered the acronym OEM Quality and might not know what it means.

What is OEM Quality? OEM Quality is an acronym for Original Equipment Manufacturer Quality, which means the OEM Quality piece will fit equivalently today as when the appliance was new.

OEM (Original Equipment Manufacturing) Quality Drip Bowls overset on an electric stove


Why is OEM Quality important? In Range Kleen's Drip Bowls and Drip Pans, we manufacture a variety of bowls and pans to fit the specific needs of many range brands; the OEM Quality fit ensures the correct fit and function for your range. A proper fit ensures cookware sits level on your range and won't rock on top of your range (which makes your cooking experience safer and more pleasant). 

Read more

What is F.O.G and Why You Should Care?

With that F.O.G. in your kitchen, ya' gotta drain it while it's hot,
drain it while it's hot,
drain it while it's hot.
- Soup Dog
Photo of dog with chefs hat on holding ladle in mouth

If you're wondering what F.O.G. is, you're not alone! F.O.G. is an acronym that stands for Fats, Oils, and Grease. And EVERYONE has a little (or a lot of) F.O.G. in their kitchen from cooking meats, batches of bacon, sausage, ribs, and so forth. There's also F.O.G. in things like salad dressing and creamy gravy. 


Picture of steaks in stainless steel fry pan


Photo of cooked bacon in fry pan

You should NEVER pour F.O.G. down the drain as the fats, oils, and grease congeal, then stick to the sides of plumbing, eventually causing blockages and potentially costly repairs!

Photo of clogged drain pipes from pouring fats oils and grease down drain


What SHOULD you do with F.O.G.? Dispose of it properly! Pour hot F.O.G. (up to 200˚ F) into Range Kleen's Trap the Grease: Fat Trapper Bags! Between uses, you'll fold down the top of the bag and use the locking tabs to close the bag! Closing the bag contains odors from the F.O.G.

Photo of open fat trapper bag and skillet with grease being poured into bag.

 Use these fantastic bags with or without the Fat Trapper container! Use one in your home, and take them while traveling! They're perfect for your vacation home,  Airbnb/VRBO, R.V./Camper, or cabin which tend to have fragile plumbing systems!


RV or camper photo


cooking on stove


picture of cabin

How can you get started collecting and disposing of F.O.G. safely? Head to our website! Want to save 20%? Enter discount code FRIENDS20 to save 20% off your next order!

Read more

Caring for Your Smooth Top Range

In recent years, smooth top ranges have gained popularity. These affordable appliances offer a sleek, updated look in kitchens. However, the trade-off to having a glass-top appliance is that it often involves more frequent cleaning and care than electric coil or gas ranges. 

Smooth top range with cookware on top

Allow your glass top range to cool completely. 

For daily cleanings, you can use a water and vinegar mixture (1 tbsp of white distilled vinegar per 10oz of water). Spray the mixture onto your range, then wipe away with a cloth. 

picture of spray cleaner being used on smooth top stove

For a thorough cleaning, use Range Kleen's 3-Piece Glass and Ceramic Range Cleaning Kit to remove grime, dirt and difficult messes.

Picture of smooth top cleaning kit with sponge, scrape & kleen and cleaner

Use the plastic Scrape & Kleen All Purpose Scraper to scrape any crusty or burnt-on residue. Next, grab the bottle of Smoothtop Kleener. Shake it well. Open the cap, pour a small amount directly onto the smooth top surface (less is more).

Picture of cleaner on smooth top range

Spread the cleaner with the included sponge. Next buff the smooth top with a soft clean cloth. 

Picture of wiping clean the smooth top range

Want to keep your Smooth Top Range protected? Check out Range Kleen's StoveShield™ Smooth Top Range Cover! 

Picture of glass top stove protector on smooth top range

Boring but important info: Keep cleaner out of reach of children. The cleaner contains citric acid. First Aid: Rinse eyes with water for 15 minutes. If irritation persists, contact a physician. DO NOT mix with other household chemicals.)

Read more

What is the Range Kleen difference?

Coil element electric stove photos

If you know anything about Range Kleen, it's that we take great pride in our Drip Bowls! You might even say we "geek out" when discussing them! We're the #1 Consumer's Choice in Range Accessories and here's why!

We're dedicated to ensuring your range will have the correct fit of drip bowl/drip pan. To meet this goal, we manufacture our Drip Bowls and Drip Pans according to OEM (Original Equipment Manufacturer) Quality, which means your range receives the same fit, quality, and performance today as the drip bowls/pans on your appliance post-production. 

So, how does OEM Quality benefit your range? When a drip bowl/drip pan fits properly on a range, it sits evenly and prevents the element from rocking on the drip pan/bowl (which can happen with an improperly fitted drip bowl/pan). The element rocking causes pots/pans to rock on the range, which creates a dangerous (and annoying) cooking experience and can result in injury. 

photo of level sitting on coil element on stove to demonstrate the perfect fit of range kleen drip bowls

We PROUDLY manufacture our Drip Bowls and Drip Pans right here in the good ol' USA, which means when you purchase our superior quality drip bowls/pans, you're putting your hard-earned dollars back into the American economy! In addition, we employ many associates here, which also helps put money back into our economy!

picture of drip bowls over usa flag, made in usa


Also, replacing your drip bowls instantly upgrades the appearance of your stove. It's easy to zhuzh up your range in minutes on a budget!

And for kicks, you should know that Range Kleen's bowls pass the following appliance industry standards testing

    • Fit, Function & Stability Test
    • Liquids Spill Capacity Test
    • Consumer Use and Cleaning Safety - Rolled Hem Test 
    • DuPont Ragu Test (Porcelain) 
    • 24 Hour Salt Spray (Chrome)
Read more

Q: What do Drip Bowls Do?

A: Most folks know that drip bowls catch liquid spills, crumbs and other messes. What many people don't know is that Range Kleen's Heavy Duty Chrome Drip Bowls (and Drip Pans) reflect heat toward cooking elements, increasing the efficiency of your appliance and saving you money in the long run! 

Image of drip bowl with heat swirls pointing up toward cooking element on white background, with suns outlining the exterior of photo
Read more

Q: Do I need any tools to replace my Drip Bowls?

A: No, you do not need tools to replace your Drip Bowls or Drip Pans! It's so easy; we'll show you how!

Image shows an electric cooktop with an electric coil element, drip bowl and the base of the range floating above the range


Unplug your appliance from the power source, and wait for it to cool completely. The cooking element sits on top of the Drip Bow, we'll need to remove this to access the drip bowls. 

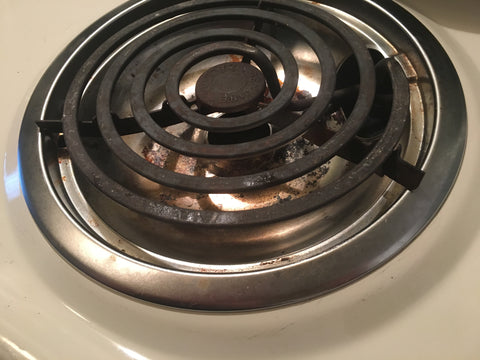
Almond color electric range featuring close up of coil burner and dirty drip bowl below burner

To remove, grasp a cooking element, then lift it out by angling it slightly upward and sliding it out of the terminal. Remove all cooking elements. 

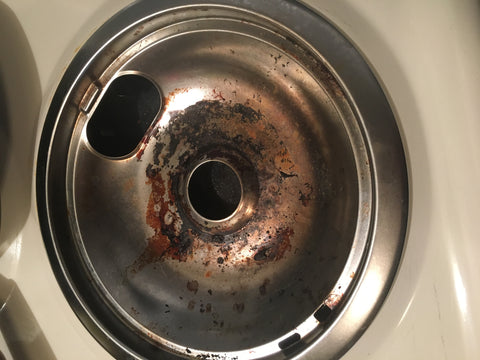
Almond color electric range featuring close up of dirty drip bowl

Then lift the drip bowl, slightly angled, out of the element well. Remove all drip bowls. Find instructions to clean drip bowls between annual replacements.

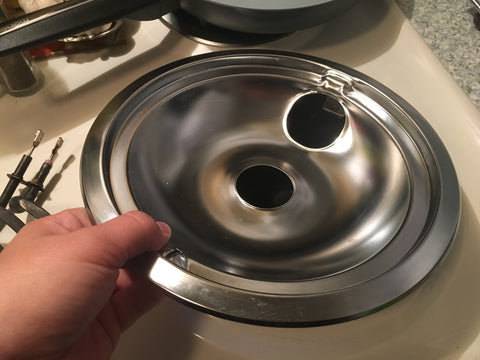
To replace drip bowls, remove Range Kleen's Heavy Duty Chome/Porcelain Drip Bowls from the packaging. Next, align one drip bowl element hole with the element plug-in hole. 

Image of chrome drip bowl held in place by hand on electric range

Then, plug the cooking element plug into the terminal.

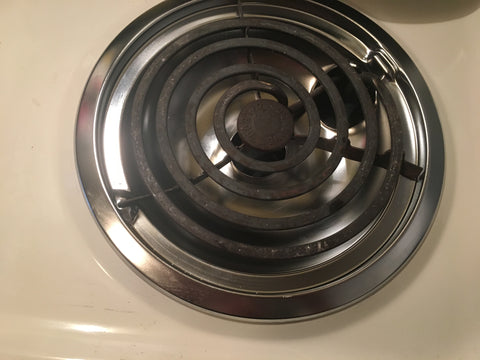
Image of electric coil element with new chrome drip bowl beneath it

Continue with this process, replacing all drip bowls and returning the cooking elements to their positions. You've replaced your Drip Bowls/Drip Pans without tools in minutes!

Read more

Q:My range has drip bowls; what do they do?

A: We hear this question often, so please know you're not alone.
Drip Bowls and Drip Pans sit beneath the coil element on your range to collect spilled liquids, crumbs, and other messes that fall beneath cooking elements. They also reflect heat toward the cooking elements, which helps your appliance run efficiently, saving you energy and money over the lifetime of your appliance!

Image shows an electric cooktop with an electric coil element, drip bowl and the base of the range floating above the range
Have questions about replacing your drip bowls or drip pans with Range Kleen's Heavy Duty Chrome or Heavy Duty Black Porcelain Replacement Drip Bowls/Drip Pans? Drop your questions below or reach out to us!

Please shoot us an e-mail at info@rangekleen.com or call us at 1.888.391.2020 or 419.331.8000!

Read more

Cleaning Drip Bowls Between Replacements

Need to clean your Drip Bowls/Drip Pans between replacing them annually?


Cleaning stubborn spills or burnt-on food using a paste made from baking soda and water is easy! Add a few tablespoons of baking soda to a bowl, and slowly add water as you stir until the paste forms.

Glass pitcher pouring water into glass bowl of baking soda

Spread the paste over your drip bowls with a sponge, then let them sit for ten minutes! Using a natural bristle brush, scrub them, then rinse the pasted off and towel dry!

Electric range image split in the middle showing dirty drip bowl and coil element and clean drip bowl and element

Can't get them as clean as you'd like? You can find your Drip Bowl fit here!


Boring but essential technical jargon: We DO NOT recommend abrasive cleaners or cleaning aid such as scouring pads. Using abrasive materials will remove or damage the finish from your Drip Bowls/Drip Pans.

Read more

Keep Your Gas Range and Renew It, Too!

We're here to fill you in if you have yet to hear of the rising controversy with gas ranges. To curb rising cases of childhood asthma, the current administration suggested Americans remove gas ranges from their homes. 


Text at top of image says Gas Vs. Electric? Image shows a gas cooktop element lit next to an electric coil range that is turned on
Why the controversy? According to Harvard Health Publishing of Harvard Medical School, cooking with Gas produces nitrogen dioxide, which releases microscopic airborne particles known as PM2.5. Both Nitrogen Dioxide and PM2.5 are lung irritants. In addition, according to an analysis of observational research, children living in households that use gas stoves are more likely to have asthma. Yet, observational studies cannot prove that cooking with a gas range is the direct cause of an asthma diagnosis.

We know gas ranges are here to stay. We love cooking with gas ranges; there are so many benefits of using a gas range. For example, cooking with Gas allows you to adjust the stove top heat levels instantly, offering better temperature control while cooking. Flames disperse along the sides and bottom of pans providing uniform cooking results. In addition, users can char foods over an open flame, which is a popular way to heat tortillas! Finally, ovens preheat faster using Gas as an energy source instead of electricity.


Gas ranges are also easy to clean! To clean and refresh your gas range, start by ensuring the range is turned off and wait until it's cool to the touch.


1) If your range features removable knobs, carefully remove them (so as not to turn them on).

2) Remove stove grates, burner caps (which protect the burner base below), and drip pans (if applicable). Set the drip pans off to the side.

3) Wipe the burner caps with a soft sponge, then rinse using hot water. Finally, set them aside to dry. (To clean the burner base, refer to the appliance manufacturer's instructions).

4) Rinse off the grates in the kitchen sink to release food crumbs. Mix a concoction of equal parts dish soap and baking soda; the mixture should be slightly foamy - if it's not, add a splash of water and stir. Place the grates in the sink and scrub them with a non-abrasive sponge, coating each grate in the mixture you've whipped up.

4) Allow the grates to soak for 15 minutes.

5)Wipe the stovetop down with a warm, damp rag. Next, create a cleaning solution using 1/2 tsp. of dish soap (which contains a degreasing ingredient) with 2-3 cups of water. Transfer the liquid into a spray bottle and spritz your stovetop. If the stovetop has baked-on messes or grease, allow the solution to sit for 5-10 minutes; then scrub with a non-abrasive sponge and use your Scrape & Kleen to scrape away any stuck-on messes.

6) Wipe the range top using a warm, damp cleaning cloth to remove the cleaning solution. Repeat steps 5 and 6 if the range top is still dirty.

7) Spritz the appliance panel with cleaning solution, then wipe it down with a damp cloth and replace the range knobs.

8) Rinse off the grates, then pat them dry using a clean towel.

9) Replace the drip pans with Range Kleen's Heavy Duty Chrome or Porcelain Drip Pans. Next, put the burner caps back on to protect the burners.

Range Kleen Chrome Drip Pan is held by hand showing how to install the drip pan

10) Finally, replace the stove grates and pat yourself on the back for a well-done job!

Read more

Refresh Your Range!

A New Year brings an opportunity to reset yourself, your home, and your life. At Range Kleen, we love January. January offers the chance to refresh our homes; it's an opportunity to harmonize our homes with our new year's resolutions to create a fresh start for the New Year. 


So many of us spend valuable time in our homes: cooking together, celebrating life milestones and successes around the dinner table, rooting for our favorite sports teams on television, celebrating birthdays, and so much more. Between whipping up sweet and savory celebratory treats and meals, your range collects grease, oil spatters, crumb spills, liquid drips, and more. Therefore, cleaning your range is the perfect start to refreshing your kitchen. 


Remove anything on top of your range or inside your oven before cleaning, then unplug your range from its power source. Wait until the entire range is cool to the touch. Next, remove heating elements and drip bowls or pans. Finally, remove the knobs from the appliance panel, wipe down the appliance panel with a damp cloth, clean off the knobs and replace them.


Image of kitchen glass cooktop with wooden countertops and white subway tile backsplash. Small bottle of cleaner, sponge and orange plastic scraper sit on top of the glass cooktop. Small plant in background.

Our Glass & Ceramic Cooktop Kleening Kit makes the range cleaning process easy:

  1. Shake the bottle of Glass & Ceramic Cooktop Kleener.
  2. Pour a pea-sized amount of kleener onto a range surface. Then use the included plastic Scrape & Kleen to scrape away baked-on messes; use the sharp corner to clean the edges and crevices of your smooth-top range.
  3. Buff the kleener from the range surface.


Instead of putting crusty, rusty, or otherwise discolored drip bowls or drip pans back onto your range, we recommend replacing them with Range Kleen's Heavy Duty Chrome drip bowls pans. Find the perfect fit for your range here. After you've replaced the drip bowls or drip pans, put the heating elements back. 


Image of electric coil range burner with drip bowl below. In the upper left hand and lower right hand corners there is a yellow color block showing chrome drip bowls

To clean the oven's interior, grab baking soda, vinegar (in a spray bottle), a wet rag, and a sponge. Although modern ranges feature self-cleaning oven cycles, many folks prefer to use these cycles sparingly as ovens generate incredibly high heat levels during cleaning, which can lead to appliance failure. 


Remove the oven racks. Fill the kitchen sink with hot water and pour in 1/2 cup of white vinegar. If possible, allow the racks to soak overnight. While the oven racks are soaking, make a baking soda paste. Mix a few tablespoons of baking soda with water to form a paste. Spread the paste inside the oven on the base and along the walls, avoiding the heating elements. Let the paste sit overnight (if possible). 

Image of a person cleaning a messy oven, brushing a baking soda paste onto the oven door while holding a stainless steel bowl. The oven has been brushed with paste.


Use a wet rag to wash away as much paste as possible. Then use your Range Kleen Scrape and Kleen to scrape away any remaining paste residue. Spritz any remaining paste with vinegar. Wipe away the vinegar and baking soda residue. Remove the oven racks from their overnight soak and give them a light scrub with a scrubbing sponge. Then rinse them with water and return them to the oven. Open the warming drawer and wipe it with a damp cloth, allowing it to air dry and close. 


Pull your free-standing range away from the wall, spray each side with vinegar and wipe down. Next, sweep or vacuum the flooring where the range sits, then wipe it with a damp cloth. When the flooring is dry, move the range and plug it into the power source. Reset the clock if necessary, and enjoy your range refresh!

Read more

Getting Holiday Ready: Last Minute To-Do's

The clock is ticking! Santa has made his list, and he's checking it twice, and now it's time for you to do the same. So tackle these last-minute to-do's today, so you'll be ready for the holiday.

If your holiday entree requires thawing, calculate the thawing time and put your entree in the fridge at the appropriate time. There's nothing worse than waking on Christmas morning and realizing you forgot to thaw the turkey!

Jot down a list of your Christmas menu, and each ingredient required to prepare these items; double-check the list against your pantry and refrigerator to ensure you have what you need—missing something? Now's the perfect time to run to the store to grab it :) Don't forget the butter - you "butter" believe you'll need it for at least one dish!

Person holds smart phone in one hand and credit card in another hand, a journal sits on a counter below featuring a list of indescript written list


Speaking of butter... kitchen F.O.G. (Fats, Oils, and Grease) typically increases during the holidays with deliciouscomfort foods abound. Here's a friendly reminder that you should NEVER pour Fats, Oils, or Grease (Butter, salad dressings, gravies, oils, grease from bacon, ham, etc) down the drain, as this can cause blockages and potentially costly plumbing repairs. Be sure to load Range Kleen's Fat Trapper: Trap the Grease canister with a new Fat Trapper replacement bag to avoid an expensive plumbing disaster over the holidays!

Image of non stick skillet pouring grease into black, rectangular container holding a grease bag, sitting on a counter. There is a Christmas tree and holiday decor in the background.

Take out the kitchen trash, give your bathrooms a quick spruce up and prepare any side dishes that you can make ahead tonight!

Wishing you a Merry Christmas from everyone at Team Range Kleen!

Read more

Getting Holiday Ready with Range Kleen

Image features the words "Getting Holiday Ready Kitchen Cleaning" in orange and yellow letters. A caucasian woman with hair pulled back in a ponytail cleans a white kitchen cabinet while wearing rubber cleaning gloves. A blue sponge sits on the wooden counter top with some small decor sitting against white backsplash.

We're preparing for the holidays because there's SO MUCH to do before you host for the holidays! Gathering with family and friends makes the extra work worthwhile. We'll start with cleaning the kitchen, the heart of your home! Working from top to bottom maximizes cleaning results and reduces your workload. 

Grab a dust mop to tackle the chore of dusting the ceiling and ceiling fan (if you have one) and dust off any light fixtures. Then dust wall corners where cobwebs may form and spot clean walls if needed.

Check the refrigerator for any inedible items, and toss or compost the food. Place any dishwasher-safe food containers in the dishwasher. Wipe down each shelf, drawer, the inside of the door, and the exterior.

Inside of refrigerator featuring white interior and glass shelves. A hand holds a pink rag, cleaning the inside of the fridge.

Make Stainless Steel appliances sparkle and shine with Ceramabryte's Steel Polish!

Bottle of Ceramabrye cleaner infront of small fake pine tree in a modern, white kitchen featuring white subway backsplash times, a sparkly range and butcher block counter tops. Small holiday decoratios and a string of lights in the background.


Wipe down small appliances. Wipe the oven's exterior, then set the self-cleaning cycle.

Wipe down the exterior of the cabinets. Next, clear off the countertops; pop any dishwasher-safe dishes/cutlery in the dishwasher, then clean off the countertops (including the backsplash).

Next, wash any dishes left in the sink; then utilize the Range Kleen's Scrape & Kleen to scrape away grime stuck in crevices around the edges of your sink!

A dirty pan sits in a stainless steel kitchen sink. The pan features soapy water with small bubbles, an orange plastic scraper and some holiday graphic accents of holly berries and pine.

Start the dishwasher. Grab a microwave-safe coffee mug, pour a few tablespoons of water and a few tablespoons of white vinegar, place the mug in the microwave, and microwave for 3 minutes. The steam will help loosen any grease and grime left. After the mug handle has cooled to the touch, remove it and wipe the microwave interior down.


Wipe down kitchen baseboards. Sweep the floor, gather dust into the dustpan, then pour the dustpan into the trash. Finally, mop the flooring according to your flooring material.

A copper motif dust pan sits behind a pile of shreded paper on a wooden floor. In the background there are holiday accents featuring holly berries and pine.

Now pat yourself on the back for a job well done!

Read more
52 results
Close page overlay
Continue shopping
Your Order

You have no items in your cart